May 10, 2012

Tipsy Thursday - #2

So have you all begun your hunt for your or your husband's old CD's? I surely have. Now that you've got your CD's what next? How to create a blank album if you've never done before?

Help is at hand..for those who love playing with sketches...I've got a few sketches to share with you...But mind you...these are for large 12x12 circles...you will need to scale them down, keeping in mind the scale of the CD's. But you can always skip out a few elements and create your pages...

Pic courtesy - Pagemaps.com
pic courtesy - pagemaps.com
For a printable file of these sketches...hop on over to Pagemaps.com...my most favorite and trusted site for sketches.


For any further questions do write in and I shall answer them to the best of my ability!

Have a nice day

Hugs

The 3 Stooges

May 3, 2012

Tipsy Thursday # 1

Hello People,

I am damn excited seeing the growing number of registrations in the inlinkz and am hoping we would be joined by many more after this post...or rather should I say after this small and quick tutorial.

I know many are apprehensive in joining the swap for the simple reason that they do not have a Crop- a -Dile.....I can hear a loud "Yes!" :) Not to worry people....you can still take part ...exactly the way I will in this swap. Yes, you heard me right.....I too do not own a crop-a dile in my craft room and have already tried my hands on two CD Mini Albums till date! Does that make you smile....thats good....so lets get going with how we can punch the holes into the CD.

Things Needed: 1. CD's
                           2. An Iron Nail (Just make sure you take a nice round one as that would ensure a                                  nice round hole on the CD)
                           3. A Tong
                           4. Permanent Marker
                           5. Knife
                           6. A Gas Stove/Candle or any other source of fire

Procedure:


Step 1. Take your first CD and mark a point where you think you want to punch the hole


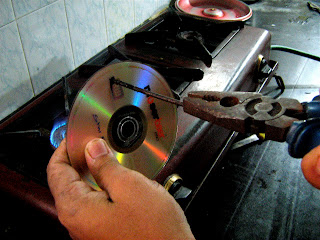
Step 2.  Hold the iron nail with a tong so that you dont burn your fingers and heat it over the gas stove or any source of fire that you can arrange in your house.....just make sure you are safe while you do this process though its not a very risky process...trust me on this!


Step 3. Take the hot nail and push it through the point which you had marked with the marker.  Let me tell those who are wondering - its not seeming easy....will the CD crack? ...etc and etc ....you will not even realise when the nail went through the CD....its damn smooth....take my word for it!


Just a picture to show you that the nail will go through the CD without cracking it up or any other damage!


Step 4. The melted CD forms a slight lump which can be easily removed with a knife while in the semi melted state....Do not let it harden....I hope in the last picture you can see a neat and clean hole on the CD.


The process may seem difficult through the pictorial depiction but this does not take more than 5 mins ....and can be done without much a do!

For the rest of the CD's align the first CD on the second one and mark the point through the first hole and repeat the process shown above.....

Hope this solves the problem most of us have....punching holes on the CD.....In Case of any further doubts please post your queries here and I would be more than happy to answer them :)

Have a nice day

Hugs

The 3 Stooges

May 2, 2012

Facts regarding the CD mini album swap.. Questions and queries answered.. ;)

We've been having a lot of queries regarding the first swap, so let me just clarify a few points:

1) The overall cost of the Project is mentioned at a max of INR 400...This is an estimated budget we have given to keep your projects within it so as to be fair to all... It includes everything, the cost of
glue, PPs, embellishments.. Since it is a 5 CD mini, after using up all the supplies it would roughly come to this. Again it is JUST an approximation and not the rule of law. The mentioned cost does not include the cost of shipping the album to the recipient!

2) I know a lot of you are worrying about how to punch holes on your CDs in case you do not have a crop a dile. Well crafters, neither of us have a crop a dile but we do have an alternative for it. Come
Thursday it would be revealed to you so please keep an eye on the blog.

3) Am posting two links to a tute on how to make a CD mini album for the convenience of first timers ...you can check the link here.  The first one is a blog with pictorial depiction and for those who find it easy to understand with a video ...the second link is just for you 


4) There were doubts regarding the possibility of sticking paper on the CD... yes a CD has shiny surface but the PPs do stick on it.. All you need is good fevicol/ fevibond or Double sided tape.
... and let it rest.. Please do not fiddle with it else you would definitely end up wasting the CD and the paper. Once it dries completely it is good to be used. Moreover just a tip..Make sure you evenly spread out the glue on the CD and not have an unequal distribution else it shows.. Yes it really does... How you embellish it is up to you!!

5) The theme in itself I suppose has flummoxed a lot of people.. So let me clear all the confusions pertaining to it.  The theme is ME.. 

It will be a blank album which you will create for the recipient to fill in his/her photographs!
Blank means...you add the PP and create space for photos and journaling and send it over to the recipient who will then use it and make an album depicting themselves. If you do add the sentiments, keep them generic...
Photo Source
You are just giving your partner the canvas, on which they will paint their memories and journaling....

This is what a blank page means.
 Bring out your personalities in your creations!!


I hope this has clarified all the doubt we've had so far.. Any further doubts and I would keep editing this post and publishing it to have all the queries under one roof... :

Have a great day.

Hugs,

The 3 stooges